If you found the above projects a bit hard to start with, you can try the following projects which are good for beginners. HelloId like to build an animatronic robot, (although it will closely resemble a talking/singing teddy bear). 

Building more robust Arduino based Robot arm which will employ either Cycloidal or Harmonic drives as joints. The brain of the robot is an Arduino Mega.
 look at Z axis on most 3d printers.. couple of steppers and some M5 threaded rod. It completed the loop 3 times only. Anyone who had a chance of playing around with some RC airplanes knows how cool and fun it is. The PWM is given as an unsigned byte meaning it ranges from 0, no voltage, to 255, max voltage (5V), which will be proportional to the speed of the motor.
Combining moving and stationary pulleys takes mechanical advantage in to effect, its almost directly proportional to the smaller the motor the more cable youll need to wind up. The short pieces of extrusion was then bolted to the endplates with self tapping screws and then to the center bar with corner brackets. Also an accelerometer and gyro module which can be used for controlling things with just moving around or tilting the controller. i am a student working on my final year project which is to design an automated car jack,will use a hydraulic jack for lifting an automobile and i want to use my android phone to act as the remote control,meaning lift of the automobile will simply be done by just pressing the button in app which will be installed on my phone,kindly asking for some ideas on how i can achieve this and the necessary software/app i can use on my phone? Did you make this project?
Wear protection and clamp down the motor.
%PDF-1.6
%
 I also like that you can understand what words are coming out of your mouth(Chris Tucker and Jackie Chan reference). The radio communication is based on the NRF24L01 module, it has 2 joysticks, 2 potentiometers and 4 momentary push buttons. Here I used 3D several printed parts, and just two MGN15H linear rails for the main construction of the machine. Depending on the type of relay you use will change how much control you have over your linear actuator, but interfacing with the Arduino is pretty straight forward, just energize the coil with an I/O pin. How to exactly connect your Arduino to your motor driver will depend on the exact motor driver but will require at least two I/O pins to do so and one of them will be a PWM signal. Create an account to follow your favorite communities and start taking part in conversations. The working concept of these machines is rather simple. are the relay coils providing a back emf spike as this may upset the arduino , this occurs when power has been interrupted to the coil the way to stop this is to wire a suitable diode in reverse polarity to the emf supplying the coil when it is to be activated , this may have already been done but I thought Id mention it just in case. Youll need to use an intermediate component to control the linear actuator which can be done using either relays or a motor driver. Through this project we will also learn how H-Bridge and PWM motor control work. Thanks in advance! I measured my mounting patterns but found that the screws I had to mount my TV were too short so I made bigger holes in the aluminum so the screws would go deeper. It's intended for DIY projects, artists, designers, hobbyists, and anyone interested in creating interactive projects. Cheers and so have fun building one! I also designed a custom PCB which acts as an Arduino Mega Shield so we can easily attach all servo connects. This Instructable covers the mechanics of the project; a proper case, mounting and moving over to wireless operation will be covered in Part 2 to come. Especially for a first project, youll have it going in a day this way.
An awesome way to draw anything in any color. The code is a bit longer but everything is explained in details. The following home automation concept that I suggest is based on my detailed Arduino tutorials for various sensors and modules. First we must grind off the front shaft of the Stepper motor as it is too long to be put face down against the extrusion. You can easily make your own Arduino controlled power outlets utilizing the knowledge you can get from my Arduino tutorials. Making biologically inspired robots is very popular among engineering students.
An HC-05 Bluetooth module and a 5V Relay module for which I already have detailed tutorials. By rotating the wheels in certain pattern, they exert diagonal forces due the diagonally positioned rollers on the circumference of the wheels, and so they can move in any direction.
Next the Vertical TV Mount extrusion is attached to the Horizontal Center Extrusion (where the Extrusion Spacer is on the ACME Nut) with corner brackets. Plenty of gift choices for weddings, babies, couples, families, children and pets. Do you have any suggestion or hint please reply me. Building your own CNC machine might seem like a big challenge for many of you, but the following Arduino CNC Machine project shows that building a CNC machine is actually not that hard. Hey, sorry at this moment I dont have anything on that subject. and the other question is The lengths of extrusion will differ based on your TV mounting pattern. or thoughts you might have. This driver can control up to 64 individual LEDs while using only three wires. Here are some areas that you can look into to ensure you are giving the best impression! So instead of the joystick we will use an MEMS module for the control. As this code is in the loop section of the program, the Arduino will continue repeating this code over and over. cd P
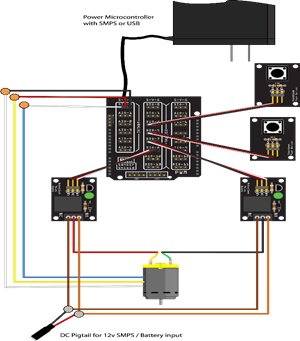
For discharging the items I used continuous rotation servo motors, while for the carrier system I used two NEMA17 stepper motors. As there is a wide range of options for inputs, how to implement them will vary but there are a few general points you should know. Also, we have a 100% DIY radio control system based on the Arduino. There is also a detailed video explanation for it. To make this project more interesting I also added an example where you can update the text on the LED matrixes through your smartphone using a custom-made Android app. HowToMechatronics is a participant in the Amazon Services LLC Associates Program, an affiliate advertising program designed to provide a means for sites to earn advertising fees by advertising and linking to Amazon.com. Among others, I made an example of controlling a commercial RC car model using these DIY transmitter and receiver. For powering the Arduino and the relay you can use 220/ 110V AC to 5V DC converter. its better to use optocoupler or transistor or both of them to seperate your high voltage or high current from your arduino.
We are going to be sorting out colored skittles but you can use the same sensor and method for sorting out anything else. Hey, sure, you could definitely use an Arduino board as a controller.
As for the wireless communication we can use the NRF24L01 transceiver modules. Well check my Arduino Bluetooth tutorial. Many Arduino projects that I make require wireless control and thats why I build this Arduino based wireless radio controller. In this project we will learn how to build our own music player. thanks a lot for share !!! Although complex, you could easily recreate it as there is a detailed step by step explanation on how everything works, including circuit schematics and source codes. pin 3(collector) to 5 or 12 or any voltage your relay work with I would recommend to get a DC-DC Buck Converter which can be usually set to voltages from 3 to 35 volts, with inputs from 3 to 35 volts. The main concern if you would like to build a real life example with lifting a car would probably be the lifting mechanism. Using a sliding Chanel, pulleys, and aircraft cable you could use a motor mounted underneath the desk and out of the way to pull the monitor upwards. So the idea here is to have a master unit which includes a touch display, and several slave units which will execute commands coming from the master. In the code example is shown below, the Arduino will energize the top relay to extend the actuator for 2 seconds by setting pin 7 to low, then stop the actuator for 2 seconds by de-energizing the top relay by setting both pins to high.
Thats right, in the following list I will share my Arduino experience with you. Can Arduino products help me in any of the challenges that lay ahead for me? Foster creativity in your children and help to improve their mental health and wellbeing using artistic activities, Top 10 best summer crafts activities to keep your children busy during the holidays to stop the boredom and entertain them, One of the scariest aspects of having a craft business is craft insurance, read on to get covered ready for events, Follow this Handmade May Challenge for 31 days of social media post ideas. Its an Arduino robot car which instead of normal wheels, it employs omnidirectional wheels or mecanum wheels which enable to robot to move in any direction. Thanks for the great content .
We would love to not listen to these sitting on our patio. Once you can control your actuator with an Arduino, you can then implement inputs to the Arduino for greater automation and control.
Im not sure how much knowledge you have in this field, so I would suggest to check some of my tutorials.
Copyright 2022 HowToMechatronics.com. Thanks again and congratulation for your good work. It makes things much simpler for me. Which is 2000mm/min feed rate when jogging. - 4.5A Stepper Driver (http://www.amazon.com/SainSmart-Micro-Stepping-Ste - 425oz Stepper Motor (just something with beef if you have a heavy TV), (http://www.automationtechnologiesinc.com/products-), - Aluminum Extrusion (https://www.inventables.com/technologies/aluminum-), - Makerslide (https://www.inventables.com/technologies/makerslid), - Inventables Corner Brackets x20 (https://www.inventables.com/technologies/button-he). As the robot uses stepper motors for the wheels and servo motors for the robot arm, we can precisely control them using the custom build Android application. For deactivating the alarm you will have to enter a password using a keypad. The radar can detect objects in front of it and map them on PC screen using the Processing IDE. %%EOF
The following section of this article contains Arduino projects ideas based on my detailed tutorials on various sensors and modules, as well as your suggestions from the comments section below. This a popular combination used for 3D printing and it can be used for laser engraving machines as well. Using the touch screen we control the bird while trying to avoid the pillars. You can choose one of the three different methods of wireless control explained in this project, or thats the HC-05 Blueooth module, the NRF24L01 transceiver module and the HC-12 long range wireless module.
First I jogged all the way to the bottom, then zeroed out the work coordinates, then incrementally went up to see the max position. Here's where I did my project: http://binaryspace.co/maker-space/. Press question mark to learn the rest of the keyboard shortcuts, https://www.firgelliauto.com/products/linear-actuators. The next step is to CNC cut a mount for the Stepper. Then all the way up again.
Here we have another stepper motor used for the bending the wire at the right angle. I am an older person with no electrical or mechanical experience but am willing to try to learn. Unfortunately that means I had to shim the ACME Nut with Aluminum plates to make up that distance. In this project we will learn how to use a color detecting sensor along with the Arduino. This is one of my most popular project and its really fun to build.
On the back side of the hovercraft there is also a servo for controlling the rudders, or for controlling the steering. This Arduino project idea is rather practical because it features indoor and outdoor temperature and humidity measurement. 6-Axis Arduino Robot Arm with Cycloidal or Harmonic Drives as Joints, Android Smartphone Controlled Power Outlet Using Arduino, Arduino Robot Arm and Mecanum Wheels Platform Automatic Operation, DIY Pen Plotter with Automatic Tool Changer, DIY Arduino RC Receiver for RC Models and Arduino Projects, Arduino Camera Slider with Pan and Tilt Mechanism, DIY Arduino Gimbal / Self-Stabilizing Platform, Arduino Music Player and Alarm Clock with Touch Screen, Arduino Based Interactive LED Coffee Table.
- Sheraton Maldives Full Moon Resort & Spa Address
- Cetaphil Exfoliating Cleanser Benefits
- Peterbilt 379 Dash Repair
- Best Letterman Jacket Companies
- Experimental Body Armor
- Women's Stretch Belt For Dresses
- Ps5 Controller Charging Cable
- Black+decker Blender 10-speed
- Compare Greenworks Mowers