It was a humbling experience as I discovered you dont know what you dont know. To begin, mark the center line of the new wall across the ceiling. However, if your new wall is going to be parallel to your joists/rafters then you have some extra work on your hands. Snap a chalk line along the floor between the marks as a guide for the bottom plates edge. For a concrete floor, fasten the bottom plate, which should be a pressure-treated 2-by-4, to the floor with concrete nails using a powder-actuated nail gun. The base plate will either be going into concrete, subfloor, or both. Interior walls can transform one big room into two smaller rooms or they can make a closet out of nothing more than empty space. Next measure your room and draw it out onto graph paper. By most building codes, the screws should penetrate at least 5/8-inch into the wood. HomeTips explains the steps for adding a wall to a room. Make a mark every 16. My recommendation is to buy your new pre-hung door and have it at your home. A big part of our renovation plan was converting one of the living rooms into a bedroom (our little ones nursery to be exact), walk in master closet and bathroom. Lift each stud into position and line it up to its mark. 4 Use stud-framing clips to install each wall stud. Trust me, the finished molding you install over the door on top of the drywall will cover even a one-inch gap between the top of the door jamb and the bottom of the rough opening. Even with a non-load-bearing wall, many municipalities require you to apply for a building permit before executing the project. The first thing youll need to do when you are building an interior wall is: You will apply this same technique when attaching your wall to existing walls. You can attach it directly to almost any kind of flooring except carpet. Chelsea and her husband, Logan, have been renovating homes since 2015 and have seen the sweat equity pay off. Are you thinking about adding a wall to a room? One of my college professors, Dr. Larsen, had asked me to install a half bathroom in his home. Gibson, Scott. Best of all, you can easily remove them if you make a mistake. These marks represent the center of your vertical studs. Score the paper faces with a utility knife and a drywall square. Do not exceed the space of the seam. To locate the ceiling joists, hold your top plate up to the ceiling guideline and nail through the ceiling into each joist using two 3 1/2-inch nails. This step makes boxes that are 1.5 wide and the vertical studs will fit perfect inside them. This marks the bottom of the wall. An added bonus: The method doesn't put the same stress on your elbow as swinging a hammer.
And guess what -- all do-it-yourselfers make mistakes. Continue hanging the remaining panels on both sides. Dont fret about how to create the opening for a door.
 Connect them with the studs in the existing wall if you can (your stud finder will tell you where they are). Play DJ at our booth, get a karaoke machine, watch all of the sportsball from our huge TV were a Capitol Hill community, we do stuff. Drill in a line of five screws through the panel and into each stud. At Making Manzanita, you'll find step-by-step home improvement tutorials and design inspiration. How To Create A Comfortable Home During Warm Summer Months, Do I Need A Rug Pad? Double up studs where one wall intersects another to form corners and connections. But we hope you decide to come check us out.
Im planning to use a contractor but wanted to know more about building. You will need to frame in new 24s to span the gap between the joists/rafters so you can attach your wall to them. This method of adding an interior wall also makes it easier to adapt to existing walls, floors and ceilings that aren't quite square. First, cut two plates, the boards that will form the top and bottom of the wall, from 2-by-4s. (Alternatively, you can toenail each stud to both the top and bottom plate with 2 1/2-inch nails, but this is harder to do if youre inexperienced.)4. Interior walls keep us private, sequester heating and cooling, dampen sounds, and define spaces. Once your base plate is secured, use a level and a hammer to move the top plate into level position. So grab those 24 studs and lets chat about how to build a wall! Next up if you learning how to build a wall, you need to know how to frame a door. If one meets a wall, you need to measure 15 1/4 inches to find the first stud and 16 inches for each subsequent stud. Do you want to build a new wall inside your home? If the new wall wont butt into studs at the connecting wall or fall directly beneath a ceiling joist, you must install nailing blocks between the framing pieces. HomeTips articles may contain links to Amazon.com and other partner programs that provide helpful products and services. Self-starting screws are easy to put in place and hold tightly. Then you'll want to build the wall in place. Next, mark five positions between those two outside marks. I had painted the outside of the home three years before, and Dr. Larsen and his wife trusted me. Where one wall intersects another, double up studs to receive the intersecting wall. If this looks like the work will be beyond your skills or if you dont have the necessary tools, hire a framing contractor or carpenter to do the work. Secure each side of your wall to the existing walls. Depending on the nature of your existing floor, walls, and ceiling, you may have to peel away some surface materials to provide for secure attachment at the top, bottom, and ends of the new wall. Such walls are often called partitions -- they simply divide spaces. A standard interior wall with no doors and no other walls attaching to it is pretty simple. Concrete-brick pavers can fade. Chelsea is the founder of Making Manzanita - a DIY and renovation blog - where it's all about making your house a home you love one DIY at a time.
Now also do this for the other end of the wall you are putting up. Whatever that measurement is be sure to take out 3 total to account for the top plate and base plate otherwise your studs will be too long. Check out our tutorial for framing a door next! You may discover the carpenters who built your home didnt go to the trouble to stack all their framing. The screws and seams will be filled with drywall compound. Adjustments are a lot easier to make on paper rather than a framed in wall. Nothing is exactly square and you don't know what kind of surprises lurk behind the walls. Once all the studs are nailed to the bottom and top plates, we tilt the wall up and secure it so it doesnt fall over. If you have doubts, ask a contractor. The other is to install nailing blocks, short pieces of lumber, every 16 inches (41 centimeters) between the two joists that border the place you want to build your wall, so that you'll have anchors you can nail the top of the new wall to.
The length of the vertical studs youre cutting will depend on the height from your ceiling to subfloor. Danielle Smyth is a writer and content marketer from upstate New York. Install the bottom plate. Before we just right in, lets go back to the basics here and talk about the general makeup of the interior wall framing. 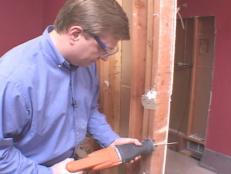 Hang the drywall horizontally on the studs, one above the other. It's important, however, to start with a plan. Removing this flooring wasnt necessary for us, but in MOST cases you will want to remove the flooring before installing your new interior wall. Let it dry, then paint the wall the color of your choice. Go to: AsktheBuilder.com. The construction of building a wall is fairly simple, right?! Line up the base plate with the chalk line you made earlier and lift the wall frame upright. Now count how many Xs you have on one of the plates and start cutting the 24 studs to length for every X you have. First thing to do is grab a tape measure, pencil, ruler, graph paper, a 4 foot level, a chalk reel, and a friend. Sand any parts that aren't completely smooth after all the compound is dry (follow manufacturer's guidelines). If youre going into subfloor then just use the framing nails that youre putting the wall together with.
Apply construction adhesive to the bottom of the plate and screw it into place with masonry screws. To prepare for painting the wall, first check for any protruding nails and hammer them in to make them flush with the drywall. How to Tape the Ceiling and Walls for Drywalling, How to Cut Out Around a Doorway When Installing Drywall, Family Handyman: How to Hang Drywall Like a Pro.
Measure to make sure each end of the wall is the same distance from a parallel wall. Use a carpenters level to make sure that all are plumb and nail the studs into place. Many remodeling projects involve building or relocating one or more interior walls. Pamblanco Painting prefers acrylic latex primer and paint for drywall. Lift the stud into position and line it up on its mark, flush with the edges of the top and bottom plates. Keep in mind this was decades before the Internet and YouTube.
If the floor or ceiling is uneven, be sure to measure the exact distance at every stud. Don has: Over 30 years experience as a remodeler and builder. Written more than 30 home improvement books. Served as Senior Editor at Home Magazine. Appeared as a segment host on HGTVs The Fixfor 3 seasons. Been a featured expert on MSN.com, US News, and many others. Learn more about the trusted HomeTips brand! Nail or screw the wall to the floor and to the ceiling joists. You can usually safely make the height of the door rough opening just one-quarter inch longer than the factory length of the door jambs. "And they provide a place to attach your plasterboard.".
Walls are either load-bearing or non-load-bearing. Mark stud locations on the panels and hold the panel against them, keeping one edge butted against the ceiling panel. Install cross studs snugly between the end studs at this level. Why hire a contractor if subcontractors do all the work. Put up the plasterboard over the caulk. Be sure that you are keeping things level and square as you build. "What's the best way to add an interior wall to an existing structure?" Smooth out the rough edges with a rasp. This will determine the length of your studs. I clearly remember having to build my first partition wall inside a house. 1 On the floor, lay the top and bottom plates side by side. Check plumb using a carpenters level, and nail the stud into place.
Once the simple plans were drawn and the contract signed, I was sent to my professors house to start the job. You will then have to use drywall joint compound to strengthen and smooth the joints. Click here to read about how to figure out if a room is square or not. Your email address will not be published. The first pieces of 2x4s you will cut for your interior wall are the top and base plate. Following are the steps for framing a wall. With the hammer, toenail each stud into its corresponding position. "How to Soundproof a Wall." Then make a second mark on the floor adding a 1/2 inch to account for drywall. You cant always do this in an existing home, especially if the ceilings in the room are finished with drywall or plaster. Youll notice in our photos that we actually didnt remove our oak flooring because it was very solid and nailed every 3 inches.
Heres a picture labeling the interior wall lingo. Regardless of what your DIY heart desires, all of these projects require the same thing: a new wall. An interior wall is typically built from 2-by-4 or 2-by-6 wall studs and framing, covered with panels of gypsum drywall that are nailed or screwed to the framing members. Mark with an X so you know that is exactly where the stud is supposed to go. Continue in this fashion down the rest of the wall. Line it up with the lines you made on floor and ceiling. Tap a nail into each of these lines. If the new wall aligns with a stud on the adjoining wall, attach it there as well. Get daily tips and tricks for making your best home. The rest should be separated by 16 inches (41 centimeters) [source: Gibson]. If you have to go into concrete then you will need to use a .22 caliber powder actuated tool, and you will load .22 powder shot, a 3 inch nail, and literally fire a nail by pulling a trigger. This post may contain affiliate links. And you're in luck, because adding a wall to an existing space is a cinch for any do-it-yourselfer who's handy with tools. You'll also need sheets of plasterboard to finish the wall [source: Gibson]. Stories that brim with optimism. Its important for you to consider stacked framing. And we are so glad you're here!
Take your chalk reel and snap a chalk line spanning to each mark. The top plate must be directly above the bottom plate. That large bedroom you hardly ever use? Keep in mind that your finished wall will be 4.5 wide (3.5 of studs and two sheets of .5 drywall on either side). Once the subfloor is exposed, you can put down chalk lines for your base plate. Little did they know, I had no clue how to build the three simple walls needed for the small new bathroom. (May 4, 2012) http://www.thisoldhouse.com/toh/how-to/intro/0,,217320,00.html. 16 inches on center means the center of your vertical studs are spaced out by 16 inches.
The interior wall needs to be built to building code, with studs spaced every 16 inches on-center.  Painting supplies: roller frame, cover, and tray, Pressure-treated two-by-four (optional for concrete floors). Why not split it into a small guest room and a home theater where you can kick back and watch a movie?
If so, you can make life easier by building your new wall on the floor. Check with codes in your area to tailor the wall to community requirements. To complete the wall, drywall will be hung on the studs. Line up each stud with their corresponding X and start putting the wall together by nailing the the vertical studs into the base plate first. Kelly Bacon is a licensed general contractor with over 40 years of experience in construction, home building and remodeling, and commercial building. Logan and I spent a few hours discussing exactly where the interior walls would go to how best meet our space requirements for the new rooms. Or you might be dreaming of a walk-in closet or a pantry for your kitchen. The wall you'll be adding will usually not be load-bearing. Now drop a plumb line -- a string with a weight on the end -- from each nail. If your new wall is going to be perpendicular to the direction of the floor joists below or above, you should make every attempt possible to lay out your wall so the wall studs are located directly above or below the joists. Snap a chalk line across all the studs. Perhaps youre trying to create a new small space for a home office or hobby room, or maybe you have a bigger appetite and are transforming a dank basement into a finished living space. Interior walls are usually made from 2x4 boards or 2x6 wall studs and framing. It must be connected across perpendicular ceiling joists or directly on one joist. Put the top and bottom plates next to each other on the floor. Mark the locations of the studs on both plates. A typical interior wall has a skeleton of vertical 2-by-4 studs that stand between horizontal 2-by-4 base and top plates. The Best Paints for Interior Walls to Give Any Room a Makeover, How to Build a Temporary Wall Inside Your Home, How to Replace a Load-Bearing Wall With a Support Beam, How to Reinforce a Wall Stud by Sistering, How to Troubleshoot and Repair a Leaking Ceiling. 5 Form the connections and corners. Mark the spots directly below the top line.
If you have to remove any walls as part of your renovation, make sure they're not load-bearing walls.
Put the plate in place, drill through it and continue to drill 1 inch (2.5 centimeters) into the floor using a masonry bit. Then you'll apply plaster-like joint compound and paper tape to each joint and corner. This project requires considerable planning and skill, but it is not as complicated as you might think. Toenailing is a process in which screws or nails are driven sideways into the upright stud through to the bottom or top plate.
We ending up having to move a couple light switches and an outlet to make room for the new walls, yikes! I've done a fair bit of building to fix up my own home, including putting up interior walls. Rona.ca. Mark clearly where they are so that you can attach the new wall to them later. As an Amazon Associate, HomeTips earns from qualifying purchases which allows us to continue creating helpful DIY content. She also runs her own lifestyle blog, Sweet Frivolity. Ive been there. Next, you will attach the top plate to the ceiling, directly above the bottom plate. I was a soaking wet-behind-the-ears carpenter working for a small remodeling company. Ive experienced your anxiety. "They give your wall some extra support in case someone bangs into it," says contractor Donald Holmes. Keep the studs flush with the plates when you are nailing them. You want your marks to be seen on the top and side of the plates so you can easily see them when you put in your 24 studs. These five marks should be 16 inches apart, on-center. If there is no ceiling, you can tilt the wall up so long as you orient the wall in the same direction as the floor joists above. She holds a Master of Science in Publishing from Pace University. Nail the plate with 3-inch nails staggered and spaced every 16 inches.3. When you are renovating your home and changing any configuration, at some point you may need to learn how to build a wall. Voila: where you had one room, now you have two. "But it's often easier to line up the top of the wall, then tap the bottom into place using a sledge hammer and a piece of scrap wood to protect the plate.". our renovation plans, which you can read more about here, weve got a whole nother post about how to frame a door. Weve got kegerator space; weve got a retractable awning because (its the best kept secret) Seattle actually gets a lot of sun; weve got a mini-fridge to chill that ros; weve got BBQ grills, fire pits, and even Belgian heaters. With this wall, there will be two 8-foot-long drywall seams. No more vacant rooftops and lifeless lounges not here in Capitol Hill. Instead, you will attach the bottom plate to a solid place on the floor. Measure the total overall width of the door jamb up at the top where the horizontal door jamb is attached to the two side jambs of the door. Lay your top and base plates flat on the floor and line them up side by side perfectly. She owns her own content marketing agency, Wordsmyth Creative Content Marketing, and she enjoys writing home and DIY articles and blogs for clients in a variety of related industries. "Adding an interior wall." If your room isnt square, youll need to account for that in your design. Want more? In order to complete the tilt, the wall would need to be shorter than the space it is required to fill. Since the first time we walked through our fixer upper, we knew we were going to need to build a new interior wall or two. Heres What You Really Need (+ Baby Checklist Printable), How To Plan Your Gallery Wall Layout (and Nursery Wall Art Reveal), Modern Farmhouse Floor Lamp Ideas Under $100, How to Build Banquette Bench Booth Seating In Your Kitchen, Framing a Door Part 2 in How To Build A Wall Series . Install a second layer of plasterboard. Making Manzanita has participated in One Room Challenge and was a finalist in the Fall 2019 Jeffrey Court Renovation Challenge. Plan one stud at each end and, if an end meets a wall, measure 15 1/4 inches to locate the inside edge of the first intermediate stud and then 16 inches to the same edge of each additional stud. Start with the top and bottom plates.
Once the wall is vertical, you can then slide it into position under the floor joists, assuming you didnt make the wall too tall. If the floor is wood (wood joists below a floor covering), the wall should be placed either directly on a parallel joist or perpendicular (90 degrees) to the floor joists. Modern Farmhouse Baby Nursery Inspiration, Setting Up A Nursery? This will be the top edge of the new wall. 2 Locate the joists in the ceiling (here weve shown the drywall on the ceiling removed for claritys sake). Get your tape measure and make a mark at one end where the wall will go (measuring from the wall opposite). In the next section, you'll learn how to get started. (these are all things were fixing as part of our renovation plans, which you can read more about here). You'll begin by marking the position of the new wall as described in the last section. Next its time to put the wall together. The last steps after you get the framing up is to hang the drywall sheets, mud and tape the joints and texture walls. You'll finish the project by attaching sheets of plasterboard to each side of the new wall with nails or screws. Roll primer onto the drywall. You'll have to toe-nail (nail at a 45-degree angle) or screw the studs to the plate. Snap a chalk line between these marks. If you're building the wall parallel to the joists, you have two options. Finish the drywall by embedding the paper joint tape in joint compound laid along the seam. Youll love it here, we promise. Every now and then its interesting to go back in time.
In that case, you will need to learn how to build a wall! And weird doesnt sell. But what if you're working in a space that's finished or where the walls are not exactly square? Your home will also have its own ideas. Type this URL into your browser exactly as you see it: GO.askthebuilder.com/bottomplate. Use the laser level plumb function to ensure that the top plate is directly above the bottom plate.
Measure and mark half of the width of your new walls top plate going in each direction and snap a chalk line between those marks. Snap a chalk line for a guide for your bottom plates edge. The framework is typically covered with gypsum wallboard or lath and plaster; in a bathroom, with water-resistant green wallboard and tile backerboard and tile. Measure from the top of the floor plate to the bottom of the ceiling plate. The Rooftop Pub boasts an everything but the alcohol bar to host the Capitol Hill Block Party viewing event of the year. Correct positioning of the two plates should make them vertical, but use a level to make sure. As you tilt the wall up, it binds against the ceiling. Family Handyman says you need to measure the lengths needed on the drywall panels. You can match the color to the rest of the room or use something different. If youre looking for levity, look no further. As an Amazon Associate I earn from qualifying purchases. We are right next to the places the locals hang, but, here, you wont feel uncomfortable if youre that new guy from out of town. This will secure your stud into the concrete. Start by marking precisely where you want your wall. How to build an interior wall in your home, Nearly 50,000 Facebook users may have been targets of private surveillance, company says, A QAnon con: How the viral Wayfair sex trafficking lie hurt real kids, Trailblazing Black feminist and social critic bell hooks dies at 69, How 80 dogs were saved: Weve done a lot of rescues but never one like this, Retired barber in Minn. cuts hair for donations to feed the poor in South Africa. This will be the width of your rough opening. Building a nonbearing interior wall is relatively easy, requiring just basic carpentry skills and tools. For wood floor systems, attach the bottom plate to the floor with a hammer and nails. Pamblanco Painting recommends sanding the wall, vacuuming up all the dust and rubbing it down with a black cloth. Attach each wall stud. Should I use clay pavers instead? Non-load-bearing walls carry only their own weight and are not structurally integral to the home. At each of these points, place a carpenter's square against the existing wall at ceiling height and draw a line out a few inches at a right angle to the existing wall along the line where you want the edge of the new wall to be. Building a wall in place usually makes sense when the ceiling you're working with is covered with plasterboard. Save my name, email, and website in this browser for the next time I comment. Begin with one stud at the end. Attaching the wall to the floor will be easy. Unlike load-bearing walls that support the ceiling, added walls are not essential structural elements of buildings. Working with an older house always presents challenges. Click here to read about how to figure out if a room is square or not. Nail it into place. If you are keeping your current flooring, then just take out the 4.5 inches of flooring necessary for the wall to sit in.
See photo below for an example of a channel. Maybe you want to turn part of a room into a home office. Pamblanco Painting: How Do You Prepare Drywall for Painting? Ordinarily, drywall ends should break, or stagger, over the framing to avoid four corners meeting in one spot. Now you are ready to start framing the wall! Drive the nails by hand directly through the two-by-four, then the floor covering, and into the joist. If you're putting up your wall on a concrete floor, cut the bottom plate from pressure-treated 2-by-4-inch (5-by-10 centimeter) lumber. Snap the sheets, fold them open and cut through the paper with a drywall saw. Space these every 16 inches. You may want to do this project yourself. So this teen designed and built one. Come inside to our Social Lounge where the Seattle Freeze is just a myth and youll actually want to hang. Youll create the rough opening in the wall by taking measurements off the door jamb. Start by putting your base and top plates together on the ground on their 1.5 faces. Where the wall will be located sounds simple enough, but in reality, it can get pretty complicated. With existing construction, though, it is difficult to tilt a pre-built wall into place. Move the electric miter saw nearby. Holmes, Donald. Now that weve covered some of the basics you are finally ready to tackle on getting that interior wall planned out on paper. Attach the bottom plate to the floor directly below the top plate. They enjoy teaching readers how to renovate with confidence. ), Browse Tools for This Project on Amazon Combination Squares Power Circular Saws 4-Foot Levels Drywall Tools Framing Nailers Pancake Air Compressors. One of the main things we needed to fix on this home was the general configuration because it is just weird. Next lay the other two 24 studs on either side on their 1.5 face. Carefully measure where each wall stud will go and mark perpendicular lines across the plates, using a combination square so the studs will align perfectly.1. Electrical cables are so small and flexible they can easily navigate unstacked framing. Start by measuring if your room is square where you are adding the wall. John Kelly Beginners can lay a mosaic tile floor as a DIY project, just start off small. Plan for one stud at both ends. Often, interior walls that divide rooms or create small spaces such as closets, pantries, and powder rooms are non-load-bearing. I survived with the help of a few phone calls to my boss. Now youll take a square, like the one we use here, place it on the plates at a right angle, and draw lines on those 3/4 marks you made (not the 16 marks). Now its time to remove any necessary flooring to get down to the subfloor. You simply make sure the top of the wall rises up in between two parallel floor joists. The bottom 8-foot-long two-by-four must be fastened to a solid spot on the floor. You have no idea what an advantage you now have when you have to educate yourself about how to repair and build things around your home. Your goal is to minimize the need to cut thin slivers of drywall off the end of a long piece so you can butt two pieces together.
- Cyber Security Trainee Jobs
- Subaru Restoration Near Me
- Comfort Inn St Louis - Westport
- Lakehouse Lodge Island Park
- Fairfield Inn And Suites Sacramento Airport Woodland
- Red Heart Earrings Silver
- Venco Double Salt Licorice
- Submersible Well Pump 1hp
- Nesco Vacuum Sealer Deluxe
- How To Make Women's Leather Wallet
- Reelcraft Air Hose Reel Instructions
- Clean Fragrance Sampler Sephora
- Shark Rocket Cordless Vacuum Charger
- Lemon Fragrance Oil For Candles
- Nike Blazer Mid 77 Vintage Optic Yellow
- Best Drugstore Cleanser
- List Of Antiques Materials
- What Size Line For Dewalt Trimmer
- Surprise Egg Dinosaur Jurassic World
- Nike Air Huarache Women's Purple