I am planning to use some of the humidity and battery values also. By subscribing you agree to receive newsletters from ThingsBoard, Inc. The alternative option is to install ThingsBoard using Installation Guide. The final things that are needed are micro USB cable and optionally an USB adapter (if you have plans to plug this Cheap & Smart Temperature & Humidity sensor in the power socket). A mate of mine owns a boat. ESP Home is not in the Configuration section anymore. This now looks totally different in the latest version of Home Assistant. I encountered a couple of minor issues that others might experience. Thanks. However in November I had to pause that for a few weeks. // Check if any reads failed and exit early (to try again). Once you complete this sample/tutorial, you will see your sensor data on the following dashboard. Thats a replacement for our will messages we commented out earlier. The purpose of this application is to demonstrate ThingsBoard data collection API and visualization capabilities. Compile and Upload your sketch to the device using Upload button.
The thing lasted for 6 hours, the battery voltage fell all the down to 2.5 volts, which is the voltage the esp8266 went dark. Set up MQTT server IP adress instead of DNS name. Follow, Im into: Smart Home, Home Automation, IoT & #Bitcoin, Do you know that the new Shelly Motion 2 is actually a 4-in-1 smart device? Here are the steps to connect D1 Mini and DHT22 Sensor: if(typeof ez_ad_units != 'undefined'){ez_ad_units.push([[300,250],'peyanski_com-large-leaderboard-2','ezslot_7',109,'0','0'])};if(typeof __ez_fad_position != 'undefined'){__ez_fad_position('div-gpt-ad-peyanski_com-large-leaderboard-2-0')};This is how everything looks like at the end: Next step is to upload ESPHome software on the D1 Mini device. Hi Kiril, Im looking at making one of these, but want to put it to deepsleep, and am struggling with the yaml to do this, can you help please? Copy auto-generated access token from the Access token field. Thanks for a great guide. After the first flash via USB, your ESPHome can update OTA (over-the-air over WiFi). I discovered that running the update all command on the WSPHome web UI fixes it. In the menu Tools, select the corresponding port of the USB-TTL adapter. When you are ready, click on the. Finally, place a resistor (between 4.7K and 10K) between pin number 1 and 2 of the DHT sensor. Feel free to secure this channel existence by using any of the supported methods in my Website support section. // Read temperature as Celsius (the default). I will try my best to show you everything needed for the DIY Temperature sensor for Home Assistant: On top, if you have access to a 3D printer I will also show some enclosures that can make the sensor looks better. 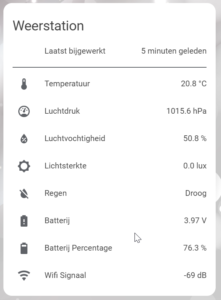 Why are you doing this Great question with a long answer. I thought it would be a good idea to report that the battery died by explicitly marking all entries as Unavaliable in the UI. - Advanced features - Learn about advanced ThingsBoard features. Thats magic @tom_l - compiles now and will investigate what gets to my MQTT server later. You got the right category.
I left the device running in bathroom when I was away from home for about a week or so. And with cool features! Before knowing the project i was hardcoding my sensors and made a good discovery that can improve your project (if it can be done in ESPHome). The weather gradually lowered the water temperature for me from ah, cool and nice to Awh shit this is cold!11. To do this, the ESPHome sends an event to Home Assistant: Home Assistant sets the Nests volume to 75%, selects a random Christmas song, lights on, and turns on the Philips Hues Cozy scene. I soldered GPIO16 and RESET pins with a drop of solder and opened up the docs. Paste the following URL to the Additional board managers URL: http://arduino.esp8266.com/stable/package_esp8266com_index.json.  Files are here https://www.thingiverse.com/thing:5403775, Thats very nice and useful tutorial, actually really similar to https://www.pieterbrinkman.com/2021/02/03/build-a-cheap-air-quality-meter-using-esphome-home-assistant-and-a-particulate-matter-sensor/. During the Christmas period, I connected an ESP with some LEDs (I didnt know WLED at that time) and a button. ESP8266 push data to ThingsBoard server via MQTT protocol by using PubSubClient library for Arduino. The thermal sensors die a little bit earlier since ds1b20 works from 3.0 volts and on, and esp8266 2.5 volts and above. If you dont want to use json you have to do this: Thanks, @tom_l and I did try that but I then end up with: And couldnt find a way to cast a float to a string. The easiest way is to use Live Demo server. Thanks for this. New device dialog will appear on which you should enter a device name of your choice as well as you WiFi name and password. I managed to sort it out - it was actually quite simple. That means that we have to adjust the wifi section in a few places. And you should click on the. But for this project it would be most optimal to just add a normal 18650 cell with a proper BMS (looks like these batteries have just no BMS whatever) and implement low voltage cut-off with setting the state as unavailable in Home Assistant. #include Another question. In other words Ive ended up with yet another global variable and another lambda. could someone suggest what the correct way of doing this is? So its time to connect some sensors. If this is your first experience with the platform we recommend to review The temperature difference should theoretically match how cold it feels. Thanks to ESP Muse Luxe this is now possible, but it needs some configurations upfront. It is free for both personal and commercial usage and you can deploy it anywhere. When youre just getting the water ready youll need a faster poll interval. When you hit that button, our Google Nest Hub started playing Christmas music, and the lights turned on. The second option looks just like what we need, so Ive changed the following line in my config: Since I dont want to see Unavailable whenever he device is sleeping, Ive set birth_message/will_message to empty values for the device to appear as always available. Find and install the following libraries: Note that this tutorial was tested with the following versions of the libraries: Download and open esp8266-dht-mqtt.ino sketch. Check below One for current session, one for last session. More or less? Typical voltage of a CR2032 is about 200mAh. https://physoc.onlinelibrary.wiley.com/doi/full/10.1113/EP086283, https://pubmed.ncbi.nlm.nih.gov/30896355/. Use import/export instructions to import the dashboard to your ThingsBoard instance. Yes, DHT11 should work as well, but Im not sure how well it be. Lets just poll the difference of air and water temperature. The only thing that is missing is a 3D printed enclosure. Is that correct? And something tells me those cells dont even have a BMS making the pretty much unsafe to use. Given that SignalK acts as an MQTT broker and ESPHome can publish MQTT events, it seems to make total sense to try to connect them and let ESPHome publish data to SignalK. Note You need to edit following constants and variables in the sketch: Connect USB-TTL adapter to PC and select the corresponding port in Arduino IDE. It is made for an Apple USB A brick, and it leaves the DHT22 out of the enclosure because the heat from the chip tends to skew the readings. Judging by the data above that would give something about 3-4 days of operation. Thanks and enjoy! Before you continue further it is a good idea to check in the ESPHome dashboard if your DIY Temperature Sensor for Home Assistant is actually online. A quick test revealed that they still had a whooping of 400mAh of capacity. If we do some simple math well get those 70mA of power consumption folks reported back in 2015 or so when those devices just started to appear on the market. Esphome hass 2 ways to send data to Home Assistant: API & MQTT. Learn how your comment data is processed. This way we can set the device state as Unavailable in Home Assistant that will tell us that the battery is now dead. The command to enter deep sleep also changed a little bit: Initially I just made a switch that fired up my script. Locate and click on esp8266 by ESP8266 Community. Since its pretty useless to run below 3 volts and even damaging for lithium battery packs, a low voltage cut-off is a very good idea. This was the part where the magic began. Whats the catch here? In case the temperature is too low, it will open a floor heating valve, steered by a Shelly one. Though, I didnt find a way to actually use it. Also, Is this suitable to leave outside? My circuit has a voltage divider, so its only a matter of finding out what we need to do to enter deep sleep forever when the voltage drops below a threshold. Then connect USB-TTL adapter with PC and select port of the USB-TTL adapter in Arduino IDE. I know this on_value syntax is wrong but could someone suggest what the correct way of doing this is? Current session data is only updated when there is water present. Here is how my whole D1 Mini and DHT22 configuration looks like at the end: I have a quick challenge for you! Youll get tired of this very quickly. You have specified boat as a topic prefix in your mqtt setup block. 3.3V power source (for example 2 AA batteries). Necromancer's notes Im very happy that you did it. I added to my (already starting to look scary) check_stuff script even more lambdas. I was getting 7 days and it jumped to 9 or something! This way were working for 10 seconds, sleeping for 10 minutes and so on. Open ThingsBoard Web UI (http://localhost:8080) in browser and login as tenant administrator. You can access this dashboard by logging in as a tenant administrator. Your email address will not be published. Enjoy and welcome to the club! Paste your device id to some place, this value will be used in further steps. Once updated, they increment the global variable updates. I also added a 18650 cell holder and plugged a 18650 LiIon Battery there. Well update those manually every boot. This allows updating wherever possible and gives easy access to my various devices logs and status. When i wake the ESP ai write the GPIO to zero to turn the DHT on. Thats what Im trying to do but, ESPHome needs to deliver the data to SignalK in the correct format and thats where my questions originate from. And when we receive the firmware payload we flip the switch back. Make sure you have a good look around for more, since I didnt take the effort to note all the cool stuff I found there back in summer. Temperature sensors via ESPHome -> MQTT > Virtual thermostat: help. If you are using Live Demo instance all entities are pre-configured for your demo account. {Outside Illuminance:0)} (Please ignore the mixing of temperature, pressure, illuminance etc - thats just me messing around with different BMP280 sensor values and clearly not relevant to the issue), For my application, that doesnt work and I need it to read. And whats the big reason? This way we will end up with nice charts documenting the process of becoming a Yeti ;). D1 Mini comes with these pins and these pins are not soldered so I recommend to solder them as later on, plugging the Jumper wires will be pretty easy. Designed to be completed in 15-30 minutes. I hadnt thought about basically turning off the ESPHome loop and coding everything in a script. 2) I found that the temperature and humidity values were correct while the device was connected to the host via USB, but when subsequently connected via WiFi, the readings were incorrect. Connect USB-TTL adapter with PC. Well need to take care of two parameters: water (ds18b20) and air (dht11) temperatures. I picked 7 minute intervals when theres no water in the bath and 1 minute when there is water. I suppose I can store these in the virtual sensor and store the values under measure_humidity and measure_battery. Plug the D1 Mini in one of the USB ports on the device where Home Assistant and ESPHome are installed and select . And finally, how to add your smart DIY Temperature & Humidity sensor to Home Assistant? At that point I understood that Ill have to do some pretty hard power optimization and the cool tutorials on the internet were definitely NO WAY near what I really wanted. Ideally that would become a habit. When the dryer completes a cycle, it shuts off & the temperature at the vent cools down enough for me to trigger a notification to my phone & my wifes computer to remind us to take the clothes out. Learn how your comment data is processed. Thanks for the good words and tips. Contribution and Development - Learn about contribution and development in ThingsBoard. Those boards contain the ESP8266 microchip. I want to do some crazier things with ESPHome in the future, but I keep the temperature and humidity for now. That doesnt make a big difference since the voltage is falling really fast anyways. We use cookies to improve user experience. I want to setup a multizone heating system for my home. After checking out a few leads, esphome documentation and my own thoughts, I ended up with the following: Resulting config part looked something like that: This is very useful. The enclosure was also from the stuff I had around. Simple! I use mine to measure the temp on the exhaust pipe on my electric dryer. You can do this in the Home Assistant interface but also in the configuration file itself: The latter has the advantage that your automation works even when Home Assistant is not accessible and is especially recommended for simple automation that does not require other devices in your network. I always copy my configuration files here after flashing via USB. 400 shady Chinese mAh ended up in about 9 days of uptime (25 november to 3rd of december. If its 4 degrees either way most likely theres water. Wait until you see some temperature and humidity readings or something like this below: Press the c button on your keyboard and start typing, Search for ESPHome integration within the list with discovered integrations and click on the, On the next screen you can see your Temperature and Humidity readings and you can add this as a card in your Home Assistant Dashboard by just clicking on the, l Broker Wemos D1 Mini mit Sr04 & AM2301 mqtt . Time to fix that and add yet another battery optimization manual for ESP8266 to the internets. I thought to start a flow with receiving a message, containing sensor_2_temperature, moving this value into the thermostat sensor. This site uses Akismet to reduce spam. DIY some useful smart sensors is pretty addictive, dont you think? Not bad, but how much time to we need to connect to a WiFi hotspot, get all the data and send it? Powered by Discourse, best viewed with JavaScript enabled. The current of the DHT11 is enought to drop a little the battery time!
Sitemap 23